WHAT IS A PINHOLE CAMERA?A pinhole camera, also known as camera obscura, or "dark chamber", is a simple optical imaging device in the shape of a closed box or chamber. In one of its sides is a small hole which, via the rectilinear propagation of light, creates an image of the outside space on the opposite side of the box. History* Images created via a small opening will be found in the natural environment and in everyday life, and people in various parts of the world have been observing them since ancient times. Probably the earliest surviving description of this kind of observation dates from the 5th century BC, written by Chinese philosopher Mo Ti. In the Western hemisphere, Aristotle in 4 BC was asking, without receiving any satisfactory answer, why sunlight passing through quadrilaterals, for example, one of the holes in wickerwork, does not create an angled image, but a round one instead, and why the image of the solar eclipse passing through a sieve, the leaves of a tree or the gaps between crossed fingers creates a crescent on the ground. In 10 AD the Arabian physicist and mathematician Ibn al-Haitham, known as Alhazen, studied the reverse image formed by a tiny hole and indicated the rectilinear propagation of light. There was another scholar during the Middle Ages who was familiar with the principle of the camera obscura, namely the English monk, philosopher and scientist Roger Bacon. It was not until the manuscriptCodex atlanticus (c. 1485) that the first detailed description of the pinhole camera was set down by Italian artist and inventor Leonardo da Vinci, who used it to study perspective. Initially, the camera obscura was, in fact, a room where the image was projected onto one of the walls through an opening in the opposite wall. It was used to observe the solar eclipse and to examine the laws of projection. It later became a portable instrument which was perfected with a converging lens. Instruments of this kind were often used as drawing aids and, at the dawn of photographic history, they formed the basis for the construction of the camera. The pinhole camera was finally also applied in modern science – during the mid-20th century scientists discovered that it could be used to photograph X-ray radiation and gamma rays, which the ordinary lens absorbs. As a result, the pinhole camera then found its way onto spacecraft and into space itself. While the first photograph taken with a pinhole camera was the work of Scottish scientist Sir David Brewster back in 1850, the technique became more established in photography during the late 19th century when it was noted for the soft outlines it produced, as opposed to lenses generating perfect, sharp images. The pinhole camera was later abandoned and it wasn't until the end of the 1960s that several artists began using it in their experiments, thus awakening renewed interest in this simple photographic apparatus which endures to this day. |
 Diagram of a pinhole camera.  Why pinhole camera images are out of focus. | Principle and characteristics As mentioned above, the image in the pinhole camera is created on the basis of the rectilinear propagation of light. Each point on the surface of an illuminated object reflects rays of light in all directions. The hole lets through a certain number of these rays which continue on their course until they meet the projection plane where they produce a reverse image of the object. Thus the point is not reproduced as a point, but as a small disc, resulting in an image which is slightly out of focus. This description would suggest that the smaller the hole, the sharper the image. However, light is essentially a wave phenomenon and so, as soon as the dimensions of the opening are commensurable with the dimensions of the light wavelength, diffraction occurs. In other words, if the hole is too small, the image will also be out of focus. The calculations for the optimal diameter of the hole in order to achieve the sharpest possible image were first proposed by Josef Petzval and later perfected by British Nobel prizewinner Lord Rayleigh (see Making the pinhole). He published the formula in his bookNature in 1891, and it is still valid today. The image created by a pinhole camera has certain characteristics which we won't find in classical lens photography. Since the process entails a central projection, the images in the pinhole camera are rendered in ideal perspective. Another special characteristic is the infinite depth of field which, in a single photograph, allows objects to be captured with equal sharpness whether they are very close up or far away. The pinhole camera takes in an extremely wide angle. The rays of light, however, take much longer to reach the edges of the negative than the centre, thus the picture is less exposed along the edges and therefore darkens. A certain disadvantage of the pinhole camera is the amount of light allowed through (small aperture), which complicates and sometimes prevents entirely the photographing of moving subjects. Exposure time is normally counted in seconds or minutes but, in bad lighting conditions, this could be hours or even days (see Determining exposure times for pinhole cameras). |
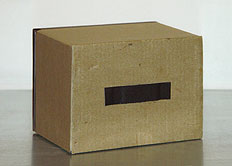 You can transform any light-proof box into a pinhole camera. Sample photograph: 1 | Pinhole Cameras Constructing a simple pinhole camera is easy. Make a hole in one side of a closable box made of material which doesn't let light in. Place a thin piece of metal or tin can with a tiny hole over the opening. On the outside of the box stick a strip of black tape over the opening which acts as the release. Then, in a dark room, attach a piece of film or photographic paper onto the opposite side and the camera is ready. The pinhole camera's simple construction offers a number of ways in which it can be constructed, using various materials. The cameras can be all kinds of shapes and sizes, with various formats and types of light-sensitive material, several holes, curved film planes, for panoramic images etc. There are all sorts of imaginative ways to make these cameras; the most ordinary of objects can unexpectedly become pinhole cameras, for example a matchbox, book, a pepper, travel bag, a delivery van, an old fridge or even a hotel room. You can, of course, turn your ordinary camera into a pinhole camera by simply replacing the lens with a small hole. And to complete the list, there are also a number of commercially produced pinhole cameras in existence, on the whole, highly elaborate models. What you experience once you design, construct and try out your own pinhole camera is difficult to describe. You'll find yourself on a whole new plane of imagination, experimentation and creativity. Moreover, the photos themselves have an unusual atmosphere and capture the world in a different way than you are used to. Make your own pinhole camera and take some photographs with it. You'll find out for yourselves. |


